Age Before Beauty, but Data Before Age
A Customer Story from In the Field
I’ve been a mechanical contractor for 30 years, but seldom have I encountered a situation like the one I found recently at a dairy plant in Ohio…
by the team at GGS
December 21, 2021
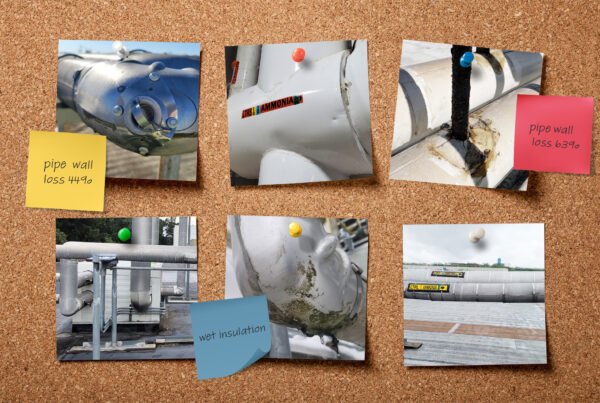
They called me in to repair a piece of equipment tied into their ammonia pipe system. When we pulled off the insulation to get access to a coupling that would serve as our end point, we discovered some corrosion rust that we traced to one of the worst looking pipes I had ever seen. Pitted and brown, it clearly needed to be replaced—in fact, it looked as though it should have been addressed some time ago.
I asked the plant manager if he could give me more information about this section of pipe, hoping to find out what notes were made when it was last tested.
Alas, he was unable to find the testing report he had received, but he told me Gamma Graphics Services (GGS) had examined the entire plant just three years prior. I had worked with GGS many times in the past and found they delivered quality work. Therefore, it surprised me to think they would have missed something like this. They surely would have detected a segment of pipe that appeared to be in such bad shape.
I called Jim at GGS to see if he could give me some insight. He pulled a copy of the report and read to me the results from testing this specific section. “We noted 7% wall loss, along with evidence of pitting and corrosion,” he said.
“But you didn’t recommend replacing them?” I asked.
“Well, no. That wasn’t necessary,” he replied.
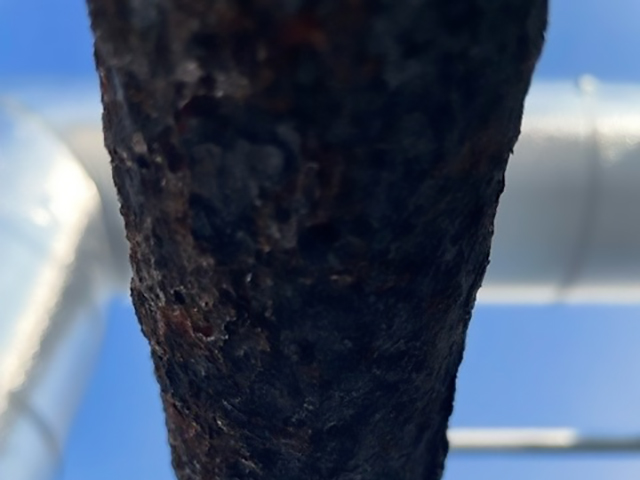
Clearly, Jim didn’t realize how bad the condition of these pipes was. “I think you need to take a look at these pipes,” I said, and I e-mailed some images over to him.
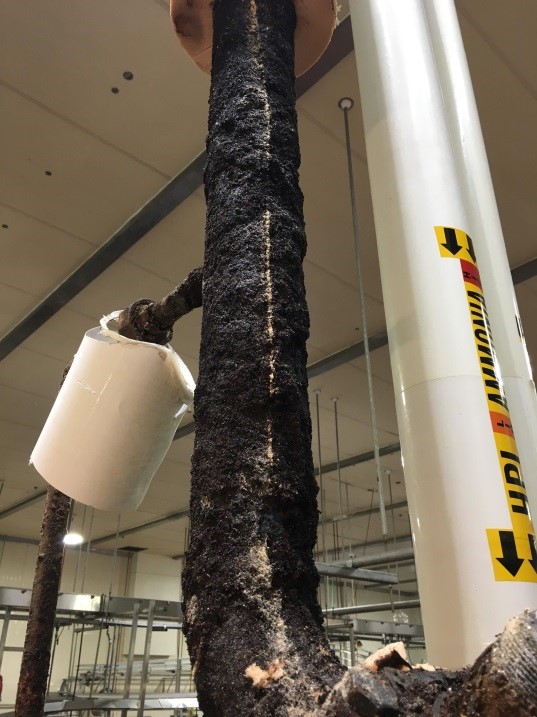
Corroded pipe at dairy plant
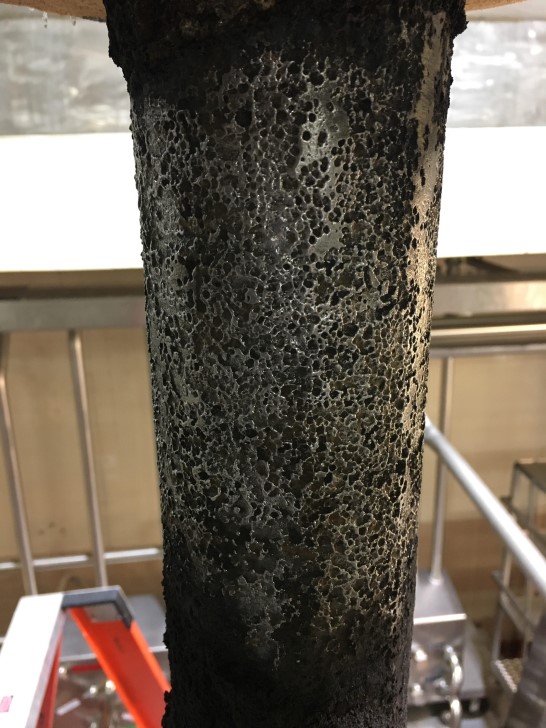
Same corroded pipe at dairy plant, cleaned
“See, Jim?” I pressed, “Not only is it brown and covered in corrosion, but as you can see in the second photo, after we cleaned the pipe, the pitting is so significant you can see it from a few feet away! You must admit, this needs to be replaced with new pipe.
Jim acknowledged, “No question, these pipes are ugly. But the presence of corrosion doesn’t necessarily equate to wall loss significant enough to replace these pipes. You have to look at the data—and the data says that pipe is ok.”
Jim went on from there, noting that because of the change in the manufacturing process of pipe over the last 20 years, the existing, pitted old pipe is actually more effective than the new pipe that we planned to install in its place.
“Even with the pitting, the remaining wall thickness on that pipe is more than you would have on a new section of pipe. If you simply coat that pipe in a protective gel and fix the breach in the vapor barrier, which you need to do anyway, you should see no new corrosion on that section of pipe. “
There was a lot to consider here. Indeed, Jim was correct, however it’s not always easy to convince a plant manager that some ugly segment like the one we had was more functional than a shiny new one.
While we assumed it would be much simpler to replace everything that looks corroded, I now had the facts that corrected this conventional thinking and ensured a longer life for this line
I learned a valuable lesson that day that has helped me save many of my customers from spending unnecessary time and money—piping is one book you can’t judge by its cover.
I manage the refrigeration system at a cold storage facility in Texas. We were nearing the end of a long day that was panning out to be routine, until we removed the insulation from the last pipe on the list, an HGD header line.
The plan for the day was to work through the list of areas on our NDT report that noted wet insulation. We had the testing done a few years back and there weren’t any ‘wet’ areas with severe corrosion or critical wall thickness loss, so this project was lower on the priority list.
My insulation contractor and I removed all the wet insulation in the system, spot checking for corrosion on the pipe as we went. Everything looked pretty good until we got to the last pipe on the list. When we removed the insulation on this HGD header, I was sure someone made a mistake.
The center of the pipe looked terrible. The entire bottom half of the pipe was corroded. Why wasn’t this replaced after we had the system tested? Either we overlooked this a few years ago, or the NDT report was wrong.
The report gave me wall thickness values at 2 locations on this pipe, both showed corrosion with minimal wall loss, less than 3%.
I at once called Jim at GGS, our NDT provider, to get some answers.
“Jim, we’ve got a problem. I stripped the wet insulation off a pipe you tested. It wasn’t flagged in our report as concerning, but I’m not sure this pipe has much life left,” I explained and sent him some pictures.
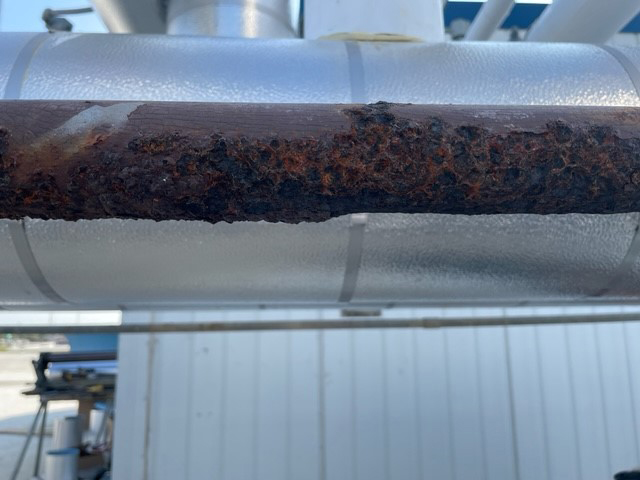
Corroded pipe at cold storage facility
Same corroded pipe (underside) at cold storage facility
He reviewed the measurements noted in the NDT report and assured me they were correct. “I know it looks bad, but I wouldn’t replace this pipe.”
“Impossible,” I retorted, “I’m going to replace it. I know that new pipe will be less than nominal but there is no way I’m going to take a chance on this.”
Jim laughed. “You’re the boss, but before you make that decision, do you have caliper handy?” I did. “We verified the line size when testing so we know this pipe is 1.5-inch schedule 80. The outer diameter (OD) for this size from the mill should be 1.900 inches. Since only the outside wall of the pipe is susceptible to wall loss, could you measure the OD of the pipe and let me know what you get?”
I reached in my tool bag, more than willing to follow his direction so that I could get some peace of mind or confirm my suspicion that this pipe needed to go.
First, I measured the worst area where corrosion had crept up to the top of the pipe – the caliper read 1.891 inches. Jim did some math and gave me the verdict, “at .008 less than nominal, the wall loss on this area is 4%.” The measurement, while only an approximate number, was in line with the NDT results.
Surprised, but relieved, I thanked Jim for easing my concerns and entered the work order. The pipe would be cleaned and coated with pipe gel before re-insulating.